Recent python door cam code – ugly, but works.

Updated version of the code…
It deals with the occasional hangs in the camera capture process by
rebooting when they happen. A line in /etc/rc.local runs the program again.

# Program for PiDoorCam

# Detects motion, and when it spots some, takes a high resolution
# picture, and sends the picture to PiScreen

import io
import os
import picamera
import ftplib
import time
from datetime import datetime
from PIL import Image
import requests

camera = picamera.PiCamera()
picamera.PiCamera.CAPTURE_TIMEOUT = 30

# If we detect 100 pixels that changed by 30, we have seen movement.
#difference = 30
#pixels = 100
# Desensitise!
#difference = 30
difference = 50
pixels = 150

# May as well use the maximum resolution of the camera.
# This is for V1. V2 is 3280 x 2464.
width = 2592
height = 1944

# I copied this voodoo motion detection from somewhere. Changed the timeout
#  setting above to prevent the occasional failures to complete captures.
def compare():
   camera.resolution = (100, 75)
   stream = io.BytesIO()
   format = ‘bmp’
   # Handle occasional ‘Timed out waiting for capture to end’
   try:
      camera.capture(stream, format)
   except:
      print (“Camera timed out, reboot needed!”)
      os.system(“sudo reboot now”)
       
   stream.seek(0)
   im = Image.open(stream)
   buffer = im.load()
   stream.close()
   return im, buffer

# Function to take a new high resolution picture, send it to PiScreen
# send it to my phone, and then delete it.
def newimage(width, height):
    when = datetime.now()
    filename = “door-%04d%02d%02d-%02d%02d%02d.jpg” % (when.year, when.month, when.day, when.hour, when.minute, when.second)
    camera.resolution = (width, height)
    camera.capture(filename)

    connected = True
    ftp = ftplib.FTP()
    ftp.connect(“PiScreen”)
   
    try:
        ftp.login(“pi”,”******************”)
    except ftplib.all_errors:
        connected = False
        print (“Failed to connect to server %s” % e)   
       
    if connected:
        ftp.storbinary(‘STOR ‘+filename, open(filename, “rb”))
        print (“Sent “, filename)

    ftp.quit()

# Code to send the Pushover message. Make picture smaller first.
    im = Image.open(filename)
    im.resize((324,243),Image.ANTIALIAS)
    im.save(filename)
   
    r = requests.post(“https://api.pushover.net/1/messages.json”, data = {
        “token”: “***********************************”,
        “user”: “*************************************”,
        “device”: “***********”,
        “sound”: “intermission”,
        “message”: filename
    },
    files = {
        “attachment”: (filename, open(filename, “rb”), “image/jpeg”)
    })
# Check r for problems – maybe put a delay here?
    if r.status_code != 200:
        print(“Pushover message failed.”)
    else:
        print(“Pushover accepted the message.”)
       
# Now delete the file.
    os.remove(filename)
    # Delay to avoid being nasty to Pushover server.
    time.sleep(5)

# Main program.

camera.rotation = 180
print(“Running door.py”)
image1, buffer1 = compare()

newimage(width, height)

while (True):

   image2, buffer2 = compare()

   changedpixels = 0
   for x in range(0, 100):
      for y in range(0, 75):
         pixdiff = abs(buffer1[x,y][1] – buffer2[x,y][1])
         if pixdiff > difference:
            changedpixels += 1

   if changedpixels > pixels:
      newimage(width, height)

   image1 = image2
   buffer1 = buffer2


Code below is an older version, the “error handling” doesn’t actually work.

# Program for PiDoorCam

# Detects motion, and when it spots some, takes a high resolution
# picture, and sends the picture to PiScreen

import io
import os
import picamera
import ftplib
import time
from datetime import datetime
from PIL import Image
import requests

camera = picamera.PiCamera()
picamera.PiCamera.CAPTURE_TIMEOUT = 30

# If we detect 100 pixels that changed by 30, we have seen movement.
#difference = 30
#pixels = 100
# Desensitise!
difference = 30
pixels = 150

# May as well use the maximum resolution of the camera.
# This is for V1. V2 is 3280 x 2464.
width = 2592
height = 1944

# I copied this voodoo motion detection from somewhere. Changed the timeout
#  setting above to prevent the occasional failures to complete captures.
def compare():
   camera.resolution = (100, 75)
   stream = io.BytesIO()
   format = ‘bmp’
   # Handle occasional ‘Timed out waiting for capture to end’
   try:
      camera.capture(stream, format)
   except:
      print (“Retrying camera.capture()”)
      camera.capture(stream, format)
 
   stream.seek(0)
   im = Image.open(stream)
   buffer = im.load()
   stream.close()
   return im, buffer

# Function to take a new high resolution picture, send it to PiScreen
# send it to my phone, and then delete it.
def newimage(width, height):
    when = datetime.now()
    filename = “door-%04d%02d%02d-%02d%02d%02d.jpg” % (when.year, when.month, when.day, when.hour, when.minute, when.second)
    camera.resolution = (width, height)
    camera.capture(filename)

    connected = True
    ftp = ftplib.FTP()
    ftp.connect(“PiScreen”)
 
    try:
        ftp.login(“pi”,”**********************************”)
    except ftplib.all_errors:
        connected = False
        print (“Failed to connect to server %s” % e) 
     
    if connected:
        ftp.storbinary(‘STOR ‘+filename, open(filename, “rb”))
        print (“Sent “, filename)

    ftp.quit()

# Code to send the Pushover message. Make picture smaller first.
    im = Image.open(filename)
#    im.resize((648,486),Image.ANTIALIAS)
    im.resize((324,243),Image.ANTIALIAS)
    im.save(filename)
 
    r = requests.post(“https://api.pushover.net/1/messages.json”, data = {
        “token”: “**********************************”,
        “user”: “********************************”,
        “device”: “************”,
        “sound”: “intermission”,
        “message”: filename
    },
    files = {
#        “attachment”: (“image.jpg”, open(filename, “rb”), “image/jpeg”)
        “attachment”: (filename, open(filename, “rb”), “image/jpeg”)
    })
# Check r for problems – maybe put a delay here?
    if r.status_code != 200:
        print(“Pushover message failed.”)
    else:
        print(“Pushover accepted the message.”)
       
# Now delete the file.
    os.remove(filename)
    # Delay to avoid being nasty to Pushover server.
    time.sleep(5)

# Main program.

camera.rotation = 180
print(“Running door.py”)
image1, buffer1 = compare()

newimage(width, height)

while (True):

   image2, buffer2 = compare()

   changedpixels = 0
   for x in range(0, 100):
      for y in range(0, 75):
         pixdiff = abs(buffer1[x,y][1] – buffer2[x,y][1])
         if pixdiff > difference:
            changedpixels += 1

   if changedpixels > pixels:
      newimage(width, height)

   image1 = image2
   buffer1 = buffer2

The Wisdom of the Ancients – Part 94

I tried to find this one one Google, but there was no sign of it!


mpirun mca_oob_tcp_recv_handler  invalid message type: 43


Basically, it means you have not noticed you are trying to control a cluster of Raspberry Pi 3 B+ computers that are running Raspbian Stretch with a Raspberry Pi that has somehow still got Raspbian Jessie on it.


You’re welcome!

Oyster, before I got all the bricks.


Marmalade


Marmalade.
I was never all that happy with the previous batch of marmalade I made in 2014. I thought it had been boiled too much, as it was quite a dark colour, and recently, I noticed that what I thought was the last jar was getting quite low.* There are only a couple of weeks of the year when the right oranges for marmalade making are in the shops, and last week I found some in Tesco. I grabbed the last Kilo.


In case you don’t know, proper marmalade is made with Seville oranges, named after the part of Spain where they are grown. These oranges are a bitter variety, full of pips. You wouldn’t want to eat them, or drink the juice. If you use ordinary oranges, you will end up with some sort of orange jam, that may well be very pleasant, but it won’t be marmalade.


If you are not near enough to Spain to have them in the shops, and want to make marmalade, look for something too bitter to enjoy, with unbelievable numbers of pips. The pips are more important than you might think, as they are full of the pectin that makes the marmalade set. 

As well as a Kilo of oranges, you will need two Kilos of granulated sugar, and two lemons. I don’t know why Tesco is only stocking foreign sugar, but local shops like Spar and the Co-op do have British sugar, made from beet. [It may have something to do with a certain government minister who used to be high up in that foreign sugar company.]


Ingredients.
1 Kg Seville oranges
2 lemons
2 Kg granulated sugar
500 ml water

These are Seville oranges; look at those pips!


The method. 
You will need a pressure cooker for this recipe. There are other recipes involving boiling things for hours, and I’m sure they work pretty much as well as this one does, but we have a pressure cooker, and it saves quite a lot of time. Cut the oranges in half, squeeze them with one of those glass juice squeezing things, which I completely forgot to take a picture of. Put the juice, and the peels in the pressure cooker. Add the juice of two lemons, but not their peels. The lemon pips can go in with the orange pips.

I used a plastic strainer to stop the pips going in. There tend to be pips still hiding in the peels, but that can be sorted out at a later stage. The pips get wrapped in a nice open weave cloth, such as cheese-cloth, muslin, or whatever you have handy that seems reasonable to use in cooking. Now add 500 ml of water. The picture on the left is the contents of the pressure cooker before boiling.


And here’s a picture of the contents of the pressure cooker after ten minutes of boiling at full pressure, followed by allowing them to cool naturally to room temperature. Notice that the pith of the oranges is cooked, and very much softer than before.


Transfer the juices to your preserving pan. It’s nice if you have a big copper plated pan for this, but we use a big old Teflon saucepan. Hooked onto the side, is our old sugar thermometer.

Now you need to squeeze the pips into the pan, until they… no, just squeeze them until you don’t think you will get any more out of them. Squeezing pips until they squeak turns out to be really difficult. Only politicians can do it. 
Throw the bag of pips away once you have got as much as you can from it. The pips supply pectin, which is what makes the marmalade set nicely.
Now, chop up the peels to your preferred size chunks. Some people like very fine pieces of peel, while I quite like big chunks. I’ve cut these ones to a medium size, as my wife prefers them small. Notice that this is when you remove the pips that have been cunningly hiding in the peels. 

Put the chopped up peels in the pan with the juice, and bring them to the boil.

Tip in the two Kilograms of sugar, and stir until it is properly dissolved. Keep heating, and keep stirring. You need to raise the temperature to 105°C.
Warning! Hot, concentrated sugar solution holds much more heat than mere boiling water, and if you splash this on yourself it will burn you badly.

That old sugar thermometer is no longer doing its job properly! It was showing something a bit below 105°C, but I thought the marmalade was looking ready, so I checked it with a cheap electronic thermometer, and as you can see, the marmalade was done! If I had heated it until the old thermometer said it was done, I would have had another batch of over-boiled marmalade.


There are all sorts of ways to test whether your marmalade is going to set, including cold saucers in the fridge, with a splash of marmalade on, but I don’t think this recipe can avoid setting, if you follow it properly, and make sure you get it to the magic 105°C.

All that remains to do is put it in clean jars. Dishwashers are the best way to clean jam jars. If you don’t have one, you’ll have to boil them up in some suitable manner. Below, you see my results. It’s very much better looking, and tasting, than the previous batch.


* I found another jar of the old, dark stuff. I threw the contents away.

Online webcam project, part 2.

Trigger warning.

Stop! Don’t look at the following photographs if you are offended by ugly applications of hot glue.

I found what I thought would be the ideal case for the camera and Pi in the kitchen. It was one of those Tesco plastic food boxes with clips and a watertight seal, and it had nasty cracks in the base in just the right spot to cut a hole for the lens. Using a variety of inappropriate tools, I made the necessary hole, and fixed the lens into it with hot glue.

Ugly hot glue!

As I warned you, very ugly hot glue. Note that it covers the join between the two parts of the lens, which I hope will ensure our good Welsh rain can’t get in between the lens elements. The next steps were to screw the inner lens cap in place, and mount the Raspberry Pi Zero inside the box. I was going to put it in the same part of the box as the lens and camera, but every arrangement I tried had the USB wireless antenna rather close to the camera and its cable. So, I mounted the Pi Zero in the lid of the box with a goodly lump of White Tac.

img_20160919_144721

A notch in the edge of the box, for the power cable, was the next thing. It’s at the bottom, and only a very small percentage of the rain around here falls upwards, so it may be OK without any sealant. I have more White Tac if there is a problem…

Software

Getting the camera to take a picture every ten minutes is not a problem, thanks to cron and the bash shell.

The intention is to use lftp to upload the pictures to the web host, but finding a decent example of code that will do that is not proving easy. Please feel free to comment if you have something suitable.

I shouldn’t have too much difficulty hacking out a web page for the picture to live in, as I am not planning anything fancy, so I’ll just use HTML, like the rest of my site.

Online webcam project, part 1.

Having decided to share the view at the back of our house with the rest of the world, I’ve finally got started. After all, it’s a pretty amazing view at times. Here’s what it was like recently. Even when it’s blurred, it’s good!

img_3650

I’m using a standard Raspberry Pi camera, and a Pi Zero to do this. Here’s the camera. I took a cheap Vivitar wide angle converter, made a hole in the rear lens cap, and glued the camera’s mounting kit to it, using a cheap glue gun.

img_20160919_103757

Here’s the current state of the thing.

img_20160919_103847

I connected to the PI with x11vnc, and took a test shot. The result is nicely in focus, thanks to the cunning design of the adapter lens, and gives a good wide angle view of the study.

test

Next, I need to set up the Raspberry Pi to upload pictures to my web site every few minutes, make a page on the web site for people to gawp at, and put the Pi in a waterproof case.

How not to do photography.

Well, I woke up this morning… (generic blues verse)

I woke up at four in the morning, for no obvious reason, and noticed that there was very bright moonlight outside, and pretty fog in the lower ground areas. The moon was very high, though, and I would have had to use a wide angle lens, which would have made all the trees look small, so I decided to wake up again in a couple of hours, reasoning that the moon should be about 30º lower in the sky, by then.

Amazingly, I woke up at six-ish. A quick squint through the viewfinder  showed I was going to need 30 second exposures. So I went and got the tripod, and opened the bedroom window wide. Autofocus couldn’t find anything to lock on to, so I switched it off. Turned the focus ring to what I thought was infinity, and it looked OK in the viewfinder.

Mistake one. It was actually quite badly out of focus.

Mistake two. I had been taking pictures for eBay, and had left the camera set on low resolution.

Mistake three. I realised this after four shots or so, and thought I had changed it, but forgot to press Set.

Mistake four was stopping to load the first four pictures onto the computer to see how they looked. While I did that, it clouded over.

Incidentally, I have no idea why WordPress chooses to put the pictures in a sequence that is unrelated to the order they were taken in.

Mistake five was not bothering to get the remote shutter release thingy, as I thought any shaking from just pressing the button would hardly matter in a 30 second exposure.

Here are the results. Try to pretend not to see any of the problems, because they are really rather pretty anyway…..

img_3659


img_3651 img_3650img_3652 img_3653 img_3654 img_3655 img_3656 img_3657 img_3658

A recent lasagne…

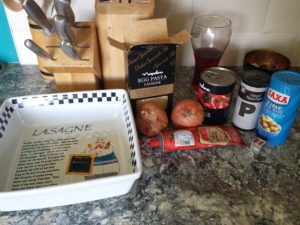
IMG_20160830_173149Here are some of the things I used to make a recent lasagne. It’s fairly hard to see, but there’s a bowl of home grown garlic at the back, on the right. Just push garlic cloves that are too small to bother peeling into the ground. A few months later, they will have multiplied enormously, and somehow pulled themselves down until they are six inches underground. I have no idea how they manage to do that, but they do. I must remember to ask my favourite botanist, if he ever visits us.
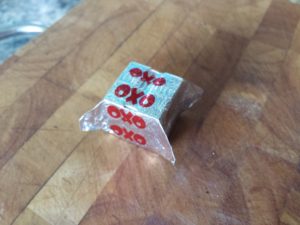
IMG_20160830_175521This is the humble, yet powerful, Oxo cube that I used, to flavour the rather insipid looking beef mince. Some people tear the foil off, and crumble the cube with their fingers. Try this… Pull the little flaps out as shown, and hit the cube a couple of times IMG_20160830_175534with your palm, until it is flattened. Now you can just rip it and tip the powdered Oxo straight into the pan. Isn’t that clever? I would credit the source of the tip, if I could remember it.

IMG_20160830_175603That meat will need to be browned properly, of course, before you carry on making the sauce, but you know that, don’t you? I wasn’t following a recipe, just doing what seemed likely to be the way I have made lasagne before.

IMG_20160830_181542Now some recipes have you put layers of sauce in with the layers of meat and pasta. I don’t do that, mainly because it increases hugely the amount of sauce you will need, and tends to make the final dish sloppy. I have been known to put in layers of grated cheese, and that can work quite well, but this lasagne didn’t have any.

Making the sauce is something one IMG_20160830_182615ends up knowing how to do without measuring things. A lump of butter of a certain size. A big, but not too big, spoonful of flour. Do not forget Colman’s mustard powder, about half a teaspoonful. It’s not enough to make the sauce taste mustardy, but it will seem dull if you forget to put it in. IMG_20160830_182651The butter and flour have to be cooked until there is what one recipe book describes as a “biscuity smell”.
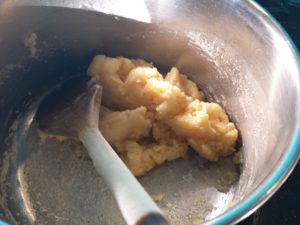
You can see how it looks after the first little bit of milk has been added, in the third shot of the pan. Gradually, more milk is added, until the sauce seems runny enough to add grated IMG_20160830_182728cheese. Please use a decent Cheddar, not soapy cheap stuff.

Lately, I have taken to cooking the layered meat sauce and pasta while I make the cheese sauce for the top, and that does help to prevent it from being sloppy. The result can be seen in the last IMG_20160830_194550picture, along with a salad that miraculously appeared while the lasagne was cooking.

Nice tins of cider also got onto the table, and made the meal even more pleasant.